
Oct 14, 2026Case Studies
How to Build a Realistic 1:64 Diecast Parking and Workshop Scene
Learn how to build a realistic 1:64 diecast parking and workshop scene with parking garages, mechanic figures, tire racks, car lifts, and miniature accessories.
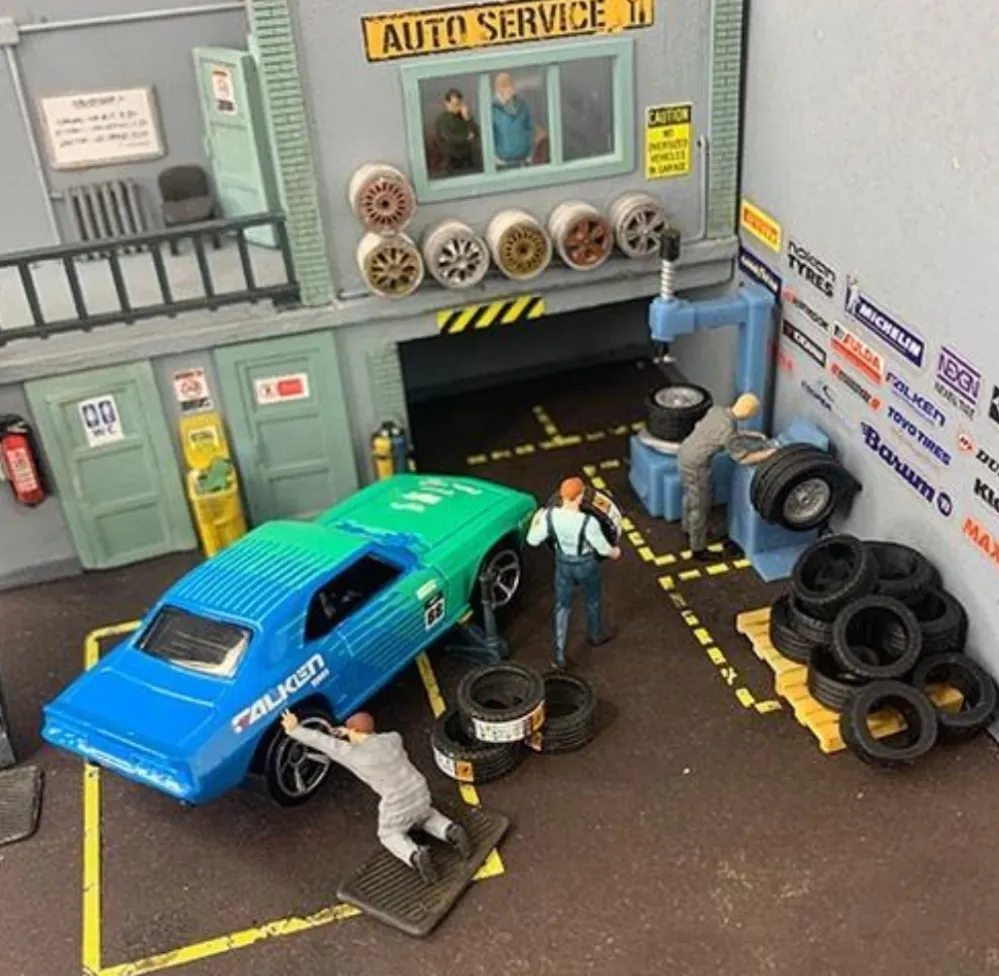
A collection of 1:64 diecast cars can look great on a shelf, but placing them in a realistic miniature environment can make the display even more interesting.
A parking garage, a small repair workshop, a few mechanic figures, and some carefully selected accessories can turn a simple car collection into a miniature automotive scene. You do not need to fill every corner with details. The key is to choose the right layout and arrange each element in a way that feels natural.
Whether you are a diecast collector building a personal display or a retailer exploring miniature diorama products, here are some practical tips for creating a realistic 1:64 parking and workshop scene.
1. Start with the Right Parking Garage
The parking garage is the foundation of your scene. It determines how much space you have, how many cars you can display, and where additional accessories can be placed.
Before choosing a design, consider the size of your collection and the space available for the display.
A single-level garage may suit a compact collection or a simple street scene. A multi-level parking garage can accommodate more vehicles while making better use of vertical space.
You should also check the dimensions of the parking spaces, ramps, and entrances. Although 1:64 is a common scale for diecast cars, vehicle dimensions can vary between models.
If you want to create a larger automotive environment, consider combining a parking structure with a separate workshop or service area. This creates different areas for parking, maintenance, and vehicle display.
2. Plan the Layout Before Adding Accessories
One common mistake when building a diorama is adding too many accessories before deciding where everything should go.
Start by placing the main elements, including the parking garage, cars, and workshop area. Then look at the overall layout from different angles.
A practical arrangement might include:
- Parking area: A space for displaying multiple cars in an organized way.
- Workshop area: A dedicated space for repair and maintenance activities.
- Equipment area: A corner for tire racks, tool cabinets, and other workshop accessories.
- Access routes: Enough room around ramps and entrances to keep the scene visually clear.
Try to leave some open space between key elements. A realistic scene does not need to be crowded with cars and equipment.
Planning the layout first also makes it easier to decide which accessories you actually need.
3. Choose Cars That Fit the Scene
The vehicles you select can influence the overall atmosphere of your diorama.
A modern parking garage might feature sports cars, supercars, SUVs, and everyday vehicles. A workshop scene could include cars that look ready for servicing or repair.
You can also arrange vehicles by color, type, or theme. For example, a collection of performance cars can create a different atmosphere from a display featuring classic cars and everyday vehicles.
There is no single correct arrangement. The goal is to make the vehicles look as though they belong in the same environment.
If you display cars from different manufacturers, an unbranded garage is a versatile choice because it does not tie the scene to one particular automotive brand.
4. Add Mechanic Figures to Bring the Scene to Life
Mechanic figures can make a workshop look more active and believable.
Instead of placing every figure in the same position, think about what each one might be doing. One mechanic could stand beside a vehicle, another could be positioned near a workbench, and another could be placed close to a car lift.
The figures should complement the cars and equipment rather than block the main view.
When choosing miniature figures, pay attention to their scale, proportions, pose, and level of detail. Their appearance should fit the overall scene.
Material quality is also worth considering, especially for figures with thin arms, legs, or other delicate parts. Check the product carefully before purchasing, and handle small accessories with care during setup.
A few well-positioned figures are often more effective than filling the entire workshop with them.
5. Use Tire Racks, Car Lifts, and Workshop Equipment
Workshop accessories add practical details that help a miniature garage feel more realistic.
You can start with a small number of items and add more as your scene develops.
Tire racks and miniature tires
Tire racks are a natural fit for a repair workshop. They can be positioned against a wall or in a designated storage area. A few miniature tires nearby can help create the appearance of a working service facility.
Car lifts
A car lift can become a focal point in the workshop. If the product dimensions are suitable for your vehicles, placing a car on or beside the lift can create a more convincing maintenance scene. Always check compatibility and follow the product's intended setup.
Tool cabinets and workbenches
These accessories help define the workshop area. Positioning them along a wall can keep the scene organized and leave more open space around the cars.
Other repair equipment
Additional tools and workshop equipment can be introduced gradually. Choose pieces that fit the available space rather than adding accessories simply to fill empty areas.
For a first setup, mechanics, tire racks, and a car lift are a useful starting combination.
6. Pay Attention to Scale and Proportions
Even attractive accessories can look out of place if their size does not match the rest of the diorama.
Before buying additional items, compare their dimensions with the cars, garage, and figures you already own.
Check the height of mechanic figures, the width of tire racks, and the proportions of car lifts and workbenches. Small differences can affect how realistic the final scene looks.
Remember that products labeled 1:64 may still vary in their actual dimensions and design. When possible, review product measurements and detailed photos before making a selection.
If you are building a scene from different suppliers, checking dimensions in advance can help avoid mismatched accessories.
7. Create Depth Without Making the Scene Too Crowded
A realistic diorama usually has a clear visual structure. Some areas attract attention, while others provide background detail.
You can create this effect by placing the main cars in visible positions and arranging smaller accessories around them.
For example, a brightly colored sports car near the front may become the focal point, while tire racks and workshop equipment can fill the surrounding space.
You can also use different levels of the parking garage to separate the display into smaller sections.
Avoid placing too many accessories directly in front of the cars. The vehicles should remain easy to see, and the overall layout should feel balanced.
8. Consider Dust Protection and Display Maintenance
Once your scene is complete, keeping it clean becomes part of maintaining the display.
Open parking garages make it easy to rearrange vehicles and accessories, but dust can accumulate on cars, figures, and small equipment.
A garage with a dust cover may help reduce dust settling directly on the display. For example, some designs use sliding front covers that allow the cars to remain visible while providing additional protection.
If you prefer an open workshop scene, leave enough room to access the cars and accessories for cleaning.
The best setup depends on how frequently you rearrange your collection and where the diorama will be displayed.
9. Start Small and Expand Over Time
You do not need to build a complete miniature automotive world in one go.
Start with a parking garage, several cars, and a few essential workshop accessories. Once you are happy with the layout, you can add mechanic figures, more equipment, or another display section.
This approach gives you time to understand which accessories work well together and helps avoid unnecessary purchases.
For collectors with growing collections, a modular approach can also make it easier to change the display as new cars are added. Just remember to check whether individual units are designed to connect or stack before combining them.
Tips for Retailers Sourcing 1:64 Dioramas and Accessories
For diecast retailers, hobby shops, and collectible stores, parking garages and workshop accessories can complement an existing range of model cars.
Instead of selecting only one type of product, consider a balanced assortment that includes:
- Multi-level parking garages for displaying multiple vehicles.
- Garage and workshop scenes for collectors who prefer automotive settings.
- Mechanic figures for adding human detail.
- Tire racks, miniature tires, and car lifts for workshop setups.
- Other accessories that allow customers to personalize their displays.
Product dimensions, material quality, packaging, and compatibility are all important when evaluating a new range.
If you are introducing dioramas to your store, testing several different models can help you assess their appearance and suitability before committing to larger quantities.
Mixed-model sample orders are one option for evaluating different designs in a single trial order.
Explore 1:64 Dioramas and Workshop Accessories from us
We offers miniature parking garages, garage and workshop scenes, street dioramas, mechanic figures, tire racks, car lifts, and other accessories for diecast model car displays.
Our range gives collectors and businesses different options for creating miniature parking and workshop environments.
For retailers and distributors, mixed-model sample orders are available, allowing you to evaluate different designs before deciding which products best fit your needs.
Contact SUNDOR to explore available models, request product details, and discuss sample options for your collection or retail range.
Final Thoughts
Building a realistic 1:64 parking and workshop scene is about combining the right elements in a balanced way.
Start with a suitable garage, plan the layout, choose compatible cars, and add a few carefully selected accessories. Mechanic figures, tire racks, car lifts, and workshop equipment can all help make the scene feel more complete.
Most importantly, build at your own pace. A well-planned display with a few carefully placed details can look far more convincing than a crowded scene filled with accessories.
With the right combination of parking structures, vehicles, and workshop details, even a small display can become an engaging miniature automotive environment.